

Welcome to the most popular page on the Art-Rageous.net website! This was one of the first projects I posted when the site was launched in 1999. Below you will find detailed, step-by-step instructions on how to create a mummy mask for art, school or decorative projects related to ancient Egypt. |  |
Grade Level:Elementary (with assistance) through High School
Materials:
Pacon 52720 Plast'r Craft Plaster Impregnated Gauze Strips
, cut into strips of varying lengths and widths
Posterboard
Scissors
Pencil
Bowl, water (warm water is best, but cold works, too)
Paper towels
Plastic Wrap (see note below)
Newspaper
Acrylic paint, brushes
Introduction:
Look at pictures of Egyptian mummy masks and notice how the Egyptians created stylized portraits of the faces. Notice the color schemes and patterns used.
Procedure:
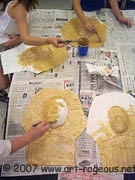
1. Prepare plaster gauze strips and water in an area covered by newspaper.
2. Using posterboard, create the "outline" of a mummy mask and cut out an oval for the student's face to stick through.
3. Cover the student's face with large pieces of plastic wrap, leaving the area around the nostrils open.
4. Position student comfortably on the floor or a table and smooth the plastic wrap as much as possible in order to follow the form of the face. Student must be able to stay completely still in order for the mask to set well and for the facial features to be accurate.
5. Place posterboard "headdress" over face. The opening should allow for the chin and top of the head to come forward, but should not be so wide that the ears are exposed.
6. Once this is in place, begin applying plaster gauze strips.

7. Wet strips in water, use fingers to remove excess moisture, and apply to side of face and onto posterboard border to about 2" from face.
8. Continue to apply strips of appropriate sizes until entire face is covered with two layers of gauze strips. Go far enough onto the posterboard to "lock" face into the "headdress" form.
9. Use tiny strips of gauze on area between nostrils. Be sure to smooth gauze as much as possible to avoid a rough textured surface.
10. Once two layers of strips have been applied to face and the posterboard next to the face, allow the cast to harden for approximately 5-10 minutes. Do not leave student alone during this time, and encourage him or her to relax and stay still. (Warm water speeds the hardening process and the new gauze we're using hardens much more quickly than the gauze we used to use.)
11. When mask has hardened (it will be warm to the touch), carefully remove it from the student's face and discard the plastic wrap.
12. After the mask has been removed, have the student use plaster gauze strips to cover the nose on the mask and work to the outer edges of the "headdress." Wrap about 1/2" of gauze onto the back of the posterboard to ensure that it is locked into place.
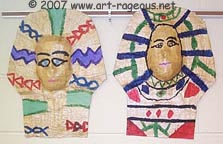
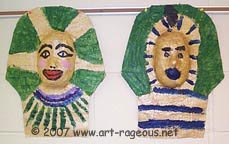
13. When mask is completely dry (the next day), have student paint the entire mask with gold acrylic paint. After that has dried, have them paint in the eyes and add other details and decorations to produce an Egyptian-style mummy mask.
This project took about three days for most of my students, one day for the casting and two days for the painting. Older students may take longer if they choose to add more details to their masks.
Notes:
When I first did this project, I had students use Vaseline on their faces and I also placed a damp paper towel over their face before applying the plaster gauze strips. I've since discovered that plastic wrap works MUCH better than Vaseline and paper towels. It's far less messy, it protects their hair from getting wet if large pieces of plastic wrap are used, and it speeds up the casting process due to less prep and clean up time! We do a lot of different types of masks and plastic wrap is definitely the way to go!

~ More Art-Rageous Egyptian & Mask-Making Ideas! ~
More Egyptian Art Projects and Lesson Plans for Children!
Egyptian Art Projects for Spectrum Summer Camp 2001
Egyptian Art Resources
Self-Expressive Plaster Gauze Mask Project!
Papier-Mache' Masks