Our basic materials for papermaking included a blender, two dishpans, two 8″ x 10″ stretcher frames covered with fine nylon screen, paper that we salvaged from various recycling bins around our school, sponges, towels, and newspapers.
Before starting this unit, I’d checked into the possibility of purchasing molds and deckles from papermaking supply companies, but there wasn’t time to order; this unit jumped to life when I found out that I would be teaching a mixed grade course (5th through 12th!) month-long course on “Papercraft.” We started the course with the basics of papermaking and used the skills learned early on for other projects.
Based on the suggestion of another teacher, I purchased stretcher frames (very inexpensively) at a local art shop, and nylon screen from a hardware store. Using U-shaped brads, we tacked the screen to the frames to make a taut surface.
Having never tried this before, I also invested in this book by Arnold Grummer:
I found it to be very helpful and it’s one I would recommend to anyone who’s new to this artform. There is a lot of history and science about paper in the book, and part of our unit involved the students being able to answer questions along these lines. There are also interesting projects to try using basic papermaking techniques. We tried some, adapted others, and came up with many ideas on our own.
To start, we filled a blender about 3/4 full with water. We then added shredded up paper—roughly the equivalent of a sheet and a half, perhaps–enough to get a consistency of a thin “milkshake” and not enough at one time to bog down the blender.
We propped a screen(s) on top of a dishpan, and poured directly from the blender onto the screen. We used a small piece of matboard to drag the pulp in from the edges of the screen.
Once the excess water had drained through into the dishpan, we would place another screen on top of the first (sandwiching the pulp in between the layers), move the whole business to some waiting newspapers and towels, and start sponging off more water.
We inverted the fragile new sheet of paper onto layers of newspapers topped with a layer of “HandiWipes.” (We started doing this after discovering that the wet paper would try to bond with the newsprint.)
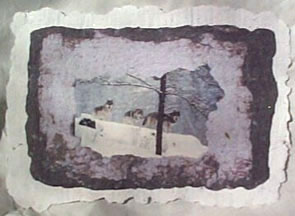
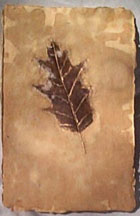
Further experimentation led us to try embedding photographs from magazines and newspapers. To do this, we poured the pulp onto the screen, let the water drain through, placed the photograph in the center, and pulled a little bit of the pulp over the edges of the picture to keep it in place. We then proceeded as “normal,” regarding further drying and pressing. We embedded leaves, flowers, and other flat objects in a similar way.
Papermaking was a new experience for both my students and me. When they would say “I wonder what would happen if I….?” it was fun to be able to say, “I don’t know. Find out!” Some students used their sheets of paper to make journals, others did paintings on the paper–it was entirely open-ended. (A relatively small class made this sort of freedom possible.)
Regarding safety, however, younger children should always be supervised when using the blender. I usually had an older student stay with the 5th graders as they were grinding up their paper into pulp.
And always be sure that the top is securely on the blender before starting it! This is for safety, but also to avoid a very impressive mess, as chopped up paper, grass, water, and odd mixtures of goop can fly incredible distances from an open blender! (Ask me how I know this…..)
So while our methods weren’t exactly conventional, we were very pleased with our results!
Note: Not too many pictures were taken during this course as there just wasn’t time!